

%20for%20Your%20Website.png)


Understanding your audience is crucial whether you’re running a personal blog or managing a business website. That’s where Google Analytics 4 (GA4) enters — the latest version of Google Analytics designed for the modern digital landscape.
Unlike Universal Analytics, GA4 provides event-based tracking, cross-platform measurement, and AI-powered insights to help you make data-driven decisions. But you must do a Google Analytics setup before you can reap the benefits.
In this guide, we’ll walk you through the entire process of setting up GA4 for your website — step-by-step and jargon-free.
What is Google Analytics 4
Google Analytics 4 (GA4) is Google’s next-generation analytics platform designed to offer a more complete, flexible, and privacy-focused way to understand user behavior across websites and apps. Unlike the older Universal Analytics, GA4 uses an event-based tracking model, where every user interaction — from pageviews to clicks and purchases — is captured as an event, allowing for more detailed and customizable insights.
It supports cross-platform tracking, helping businesses get a unified view of users across web and mobile experiences. With built-in machine learning, GA4 provides predictive insights and helps fill data gaps caused by increasing privacy regulations and cookie restrictions. It also offers more powerful reporting tools, like customizable Exploration reports, making it easier for users to analyze data in ways that fit their specific goals
Why is GA4 Beneficial?
Before diving into the setup, let’s quickly understand the benefits of GA4 for understanding users more deeply:
- Universal Analytics is no longer supported: Google officially sunset Universal Analytics (UA) on July 1, 2023, which means it has stopped collecting new data. If you're still relying on UA, your reports are outdated and incomplete. GA4 is now the default analytics platform, and continuing with UA means you're missing out on crucial user insights.
- Built for a privacy-first, cookieless future: GA4 is designed to work even as third-party cookies are phased out. It leverages privacy-focused tracking methods and advanced data modeling to fill in gaps, making it more compliant with regulations like GDPR and CCPA. This ensures that your analytics setup remains robust and future-proof.
- Unified tracking across web and apps: Unlike UA, which primarily focuses on website data, GA4 allows you to track users across websites and mobile applications in a single property. This gives you a more holistic view of the customer journey across multiple touchpoints and devices.
- Event-based data model for greater flexibility: GA4 moves away from the session-based model and adopts an event-driven approach. Every interaction, such as page views, clicks, form submissions, and video plays, is treated as an event, allowing more granular data collection and flexible analysis.
- Advanced customization capabilities: GA4 gives you more control over your data. You can create custom events, tailored conversion goals, and specific user segments. The reporting interface is also customizable, allowing you to build dashboards that reflect your KPIs and objectives.
Step-by-Step Guide to Setup Google Analytics 4
You can setup Google Analytics from scratch even with no technical background. Still, if you are not sure about how to setup a Google analytics account, then here is what you can do:
Step 1: Create a Google Analytics Account
If you don’t already have a Google Analytics account, here’s how to create one.
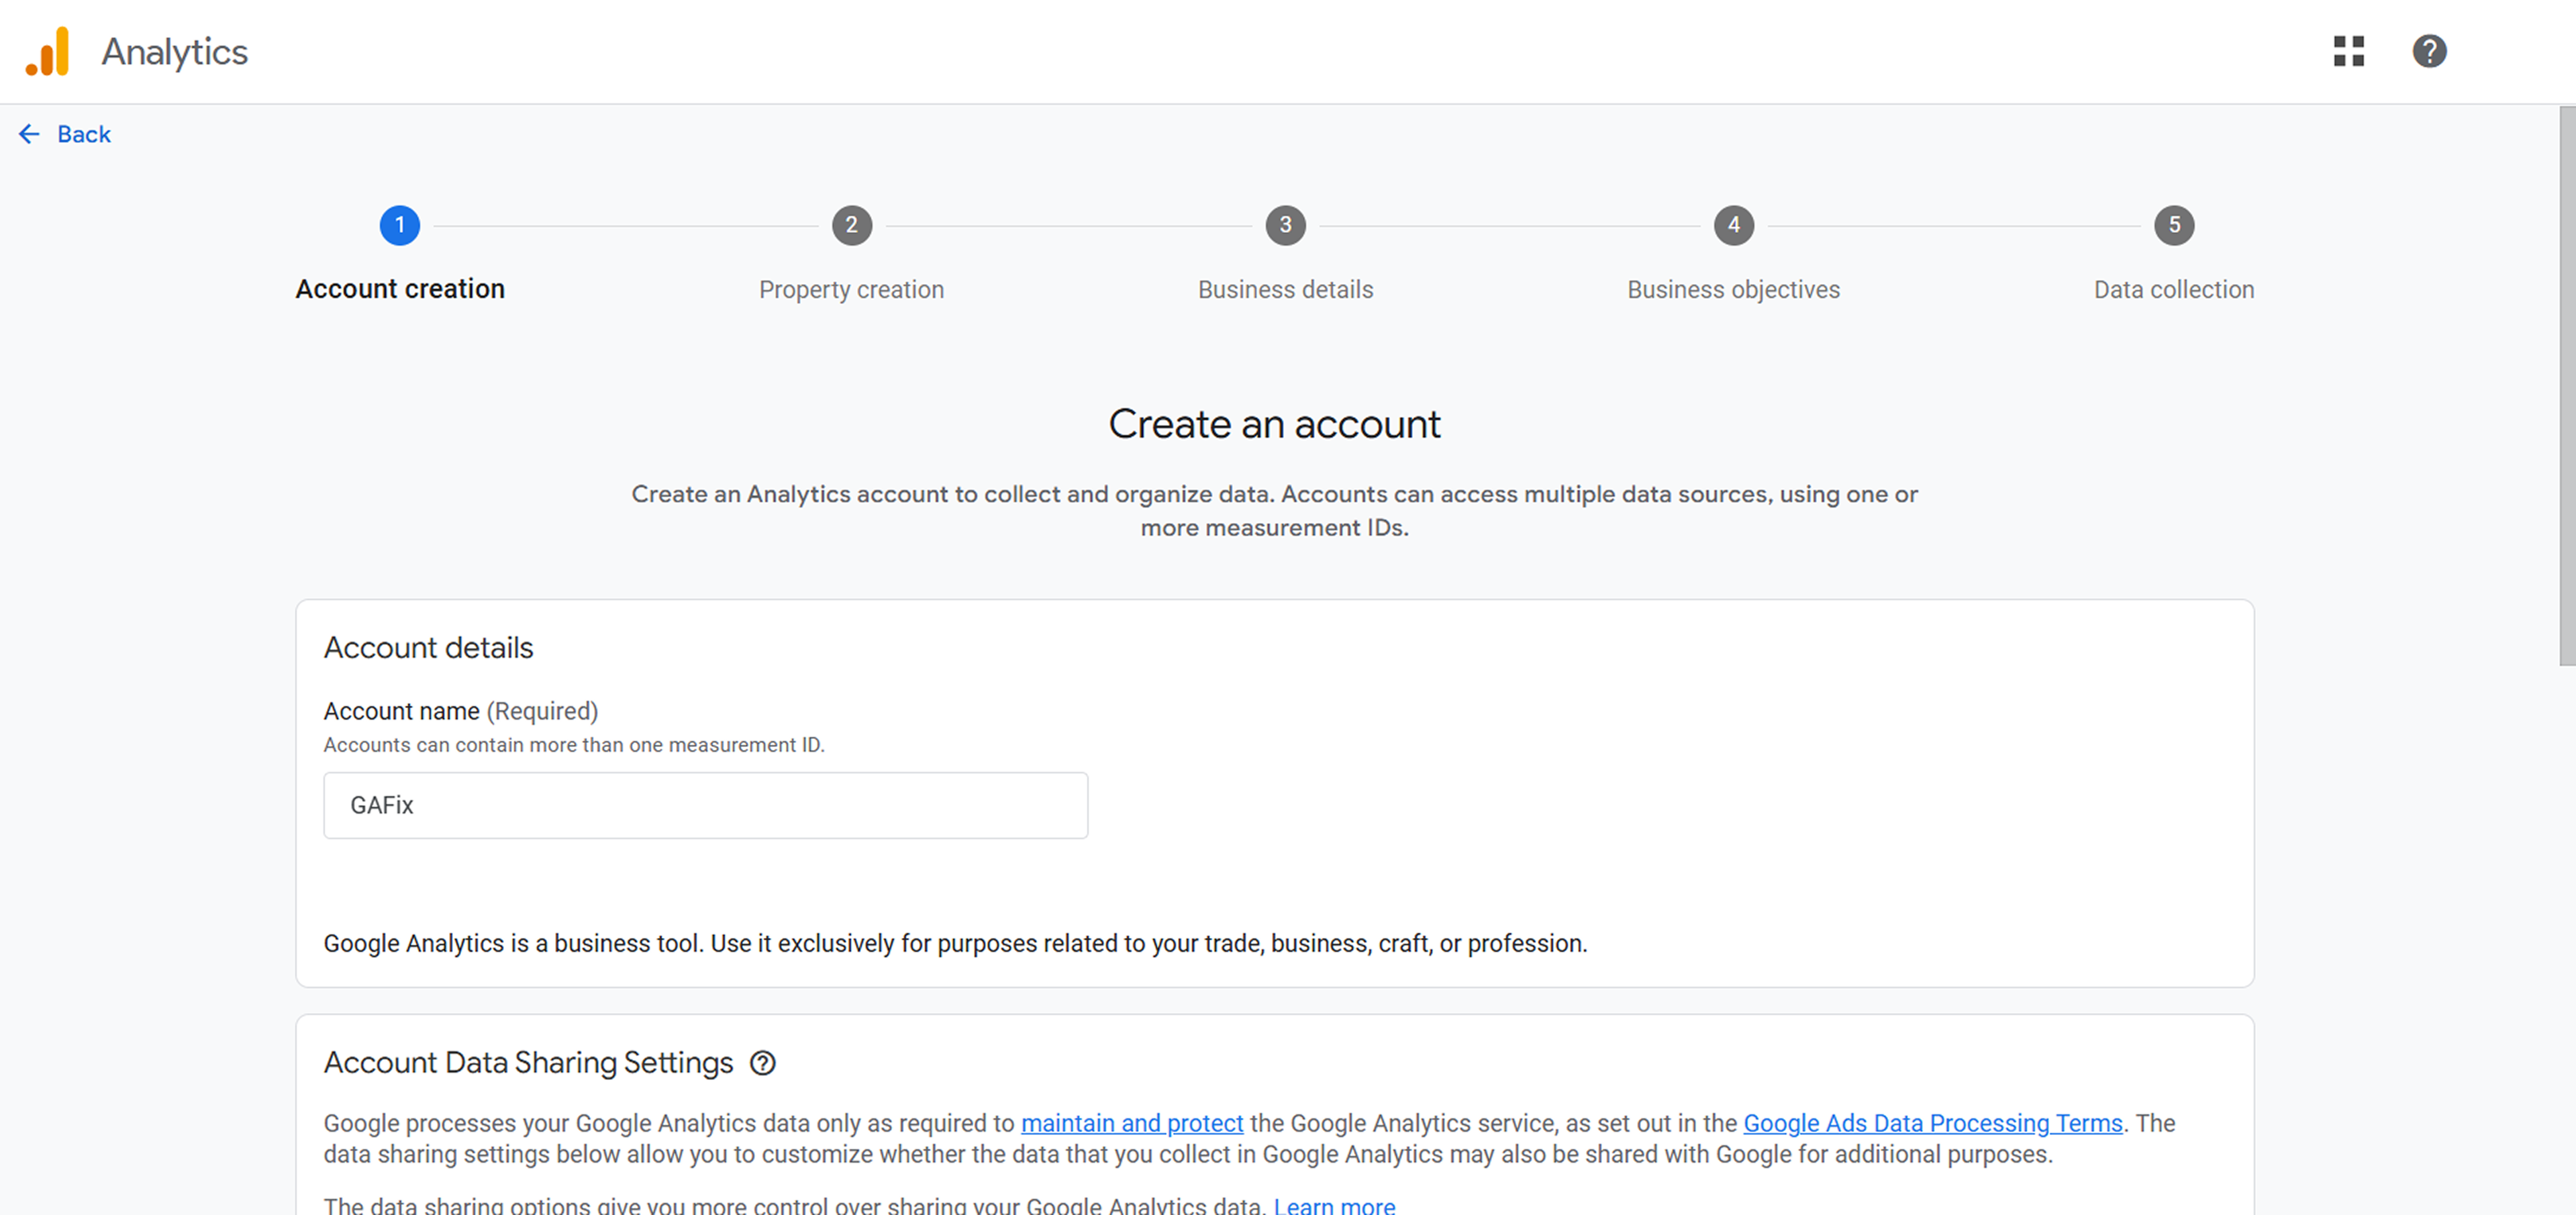
- Go to https://analytics.google.com and click on “Start measuring”.
- Account Setup Page:
- Enter an Account Name. This can be your business name or website name.
- Choose your Data Sharing Settings (these control how your data is shared with Google — choose based on your privacy comfort level).
- Click Next.
Note: A Google Analytics “account” can hold multiple properties (e.g., different websites or apps).
Step 2: Create a GA4 Property
A property is where Google Analytics stores data from your website or app. GA4 properties are event-based and future-ready.
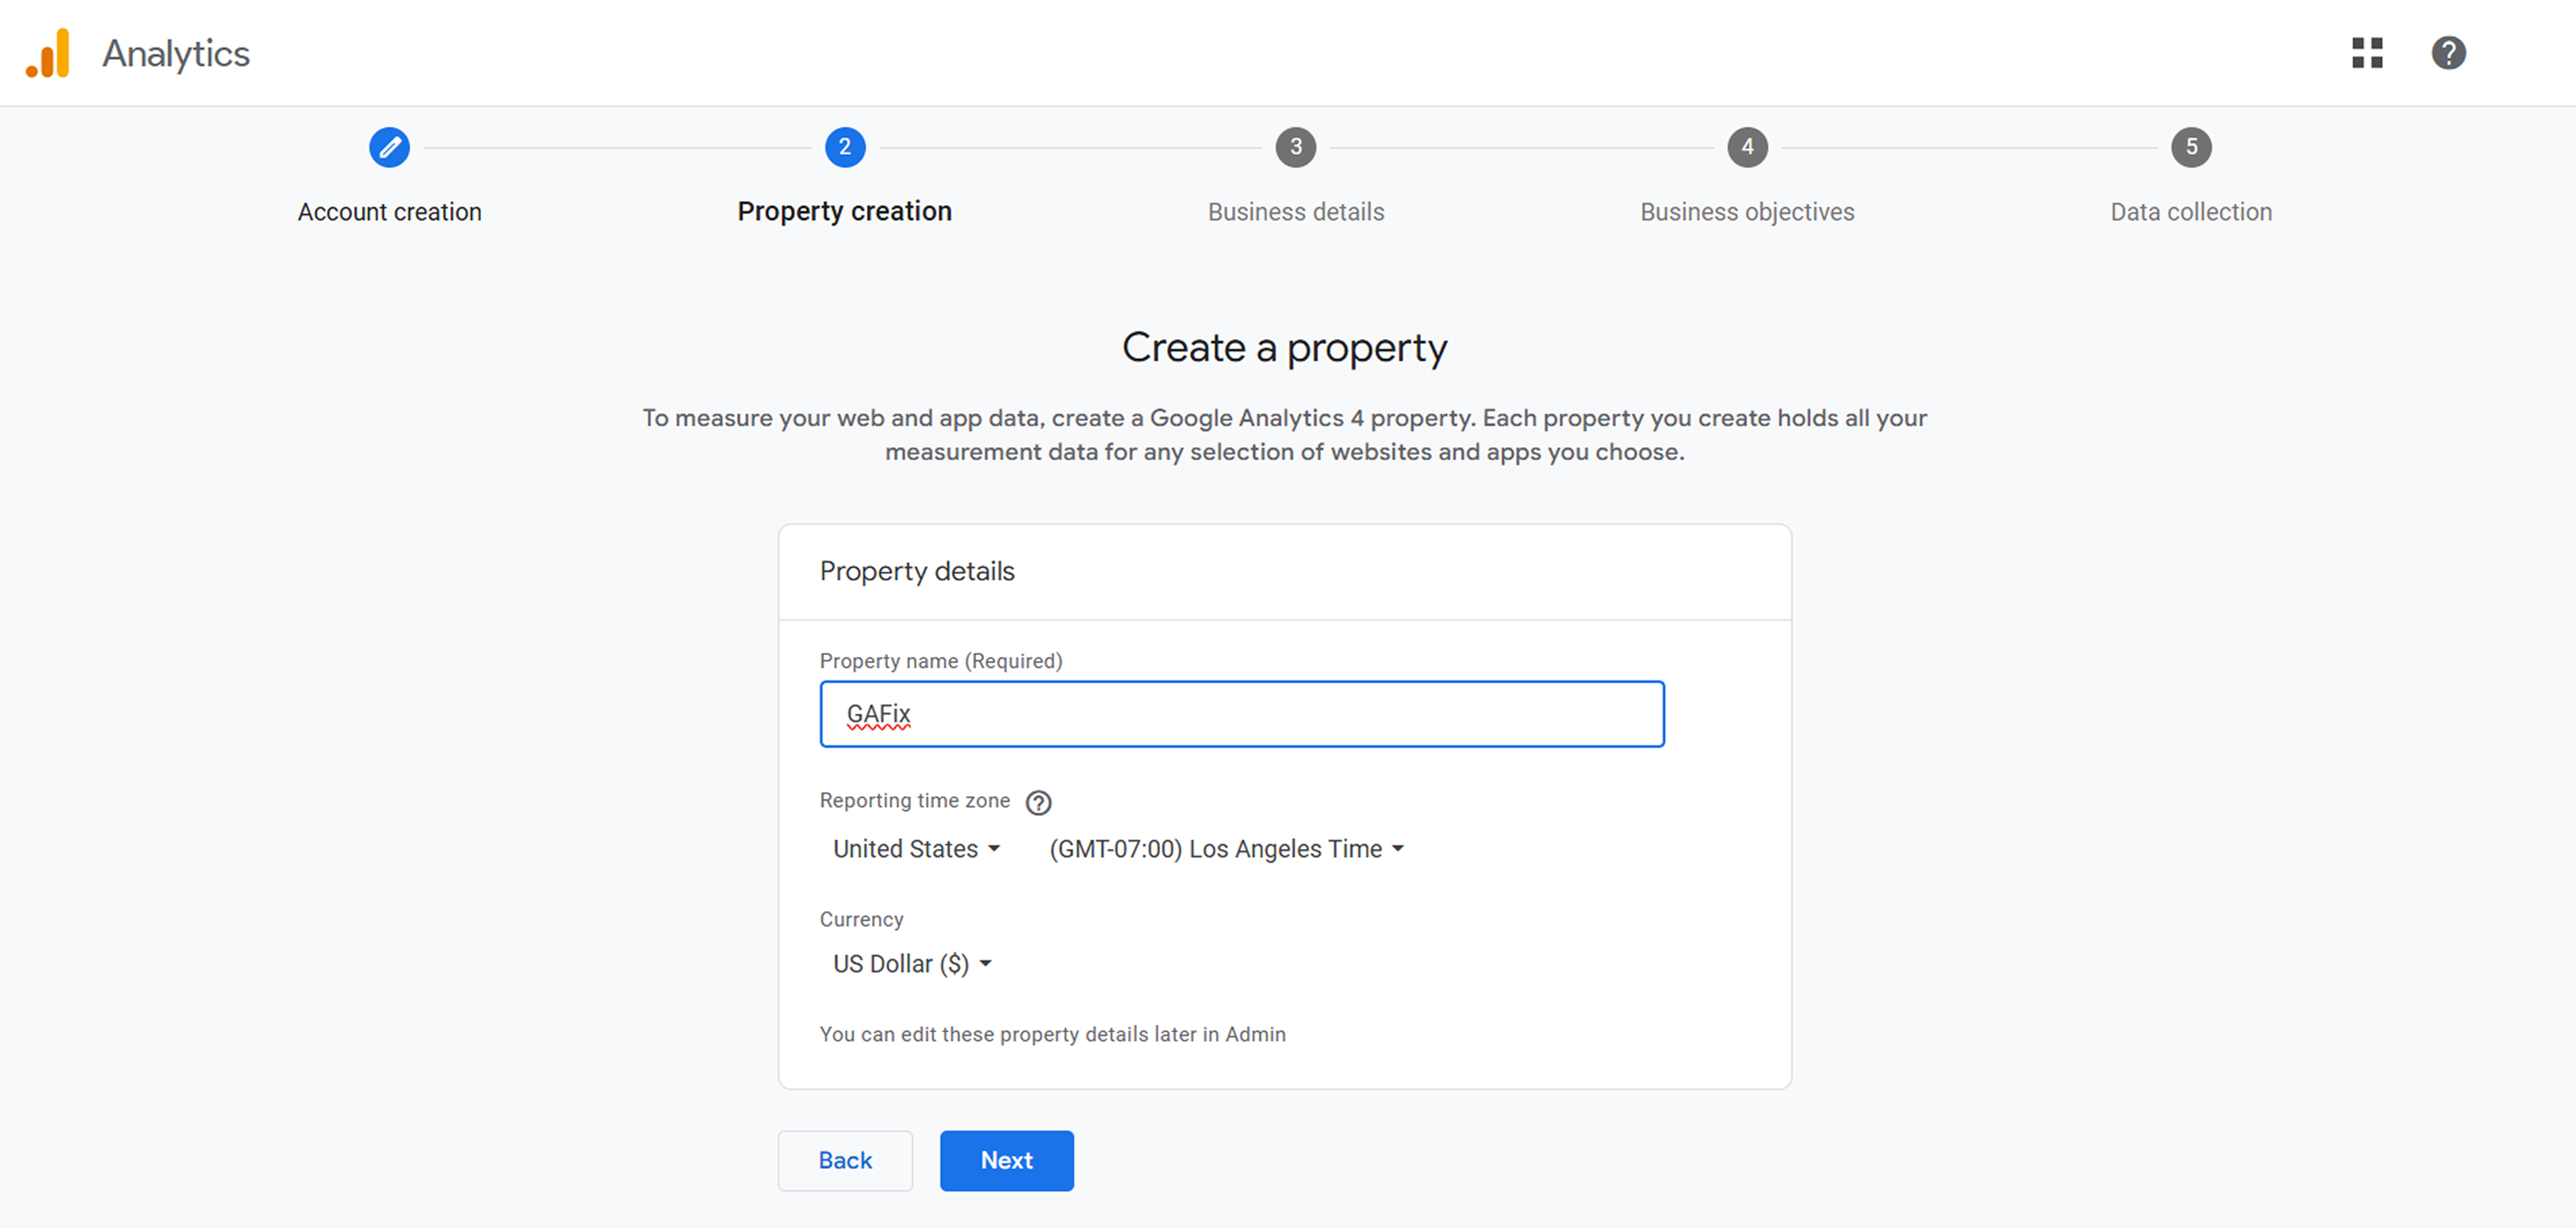
- Enter a Property Name (e.g., "MyCompany Website - GA4").
- Set the Reporting Time Zone and Currency — these will impact how your reports are displayed.
- Click Next to provide business information:
- Industry Category (e.g., Technology, Retail, Health).
- Business Size.
- Intended use of GA4 (e.g., Measure engagement, Optimize ads).
- Click Create.
- Agree to Google’s Terms of Service.
You’ve now successfully created your GA4 property.
Step 3: Set Up a Data Stream
In GA4, data from your website is collected via data streams.
Here is how you can create a Web data stream:
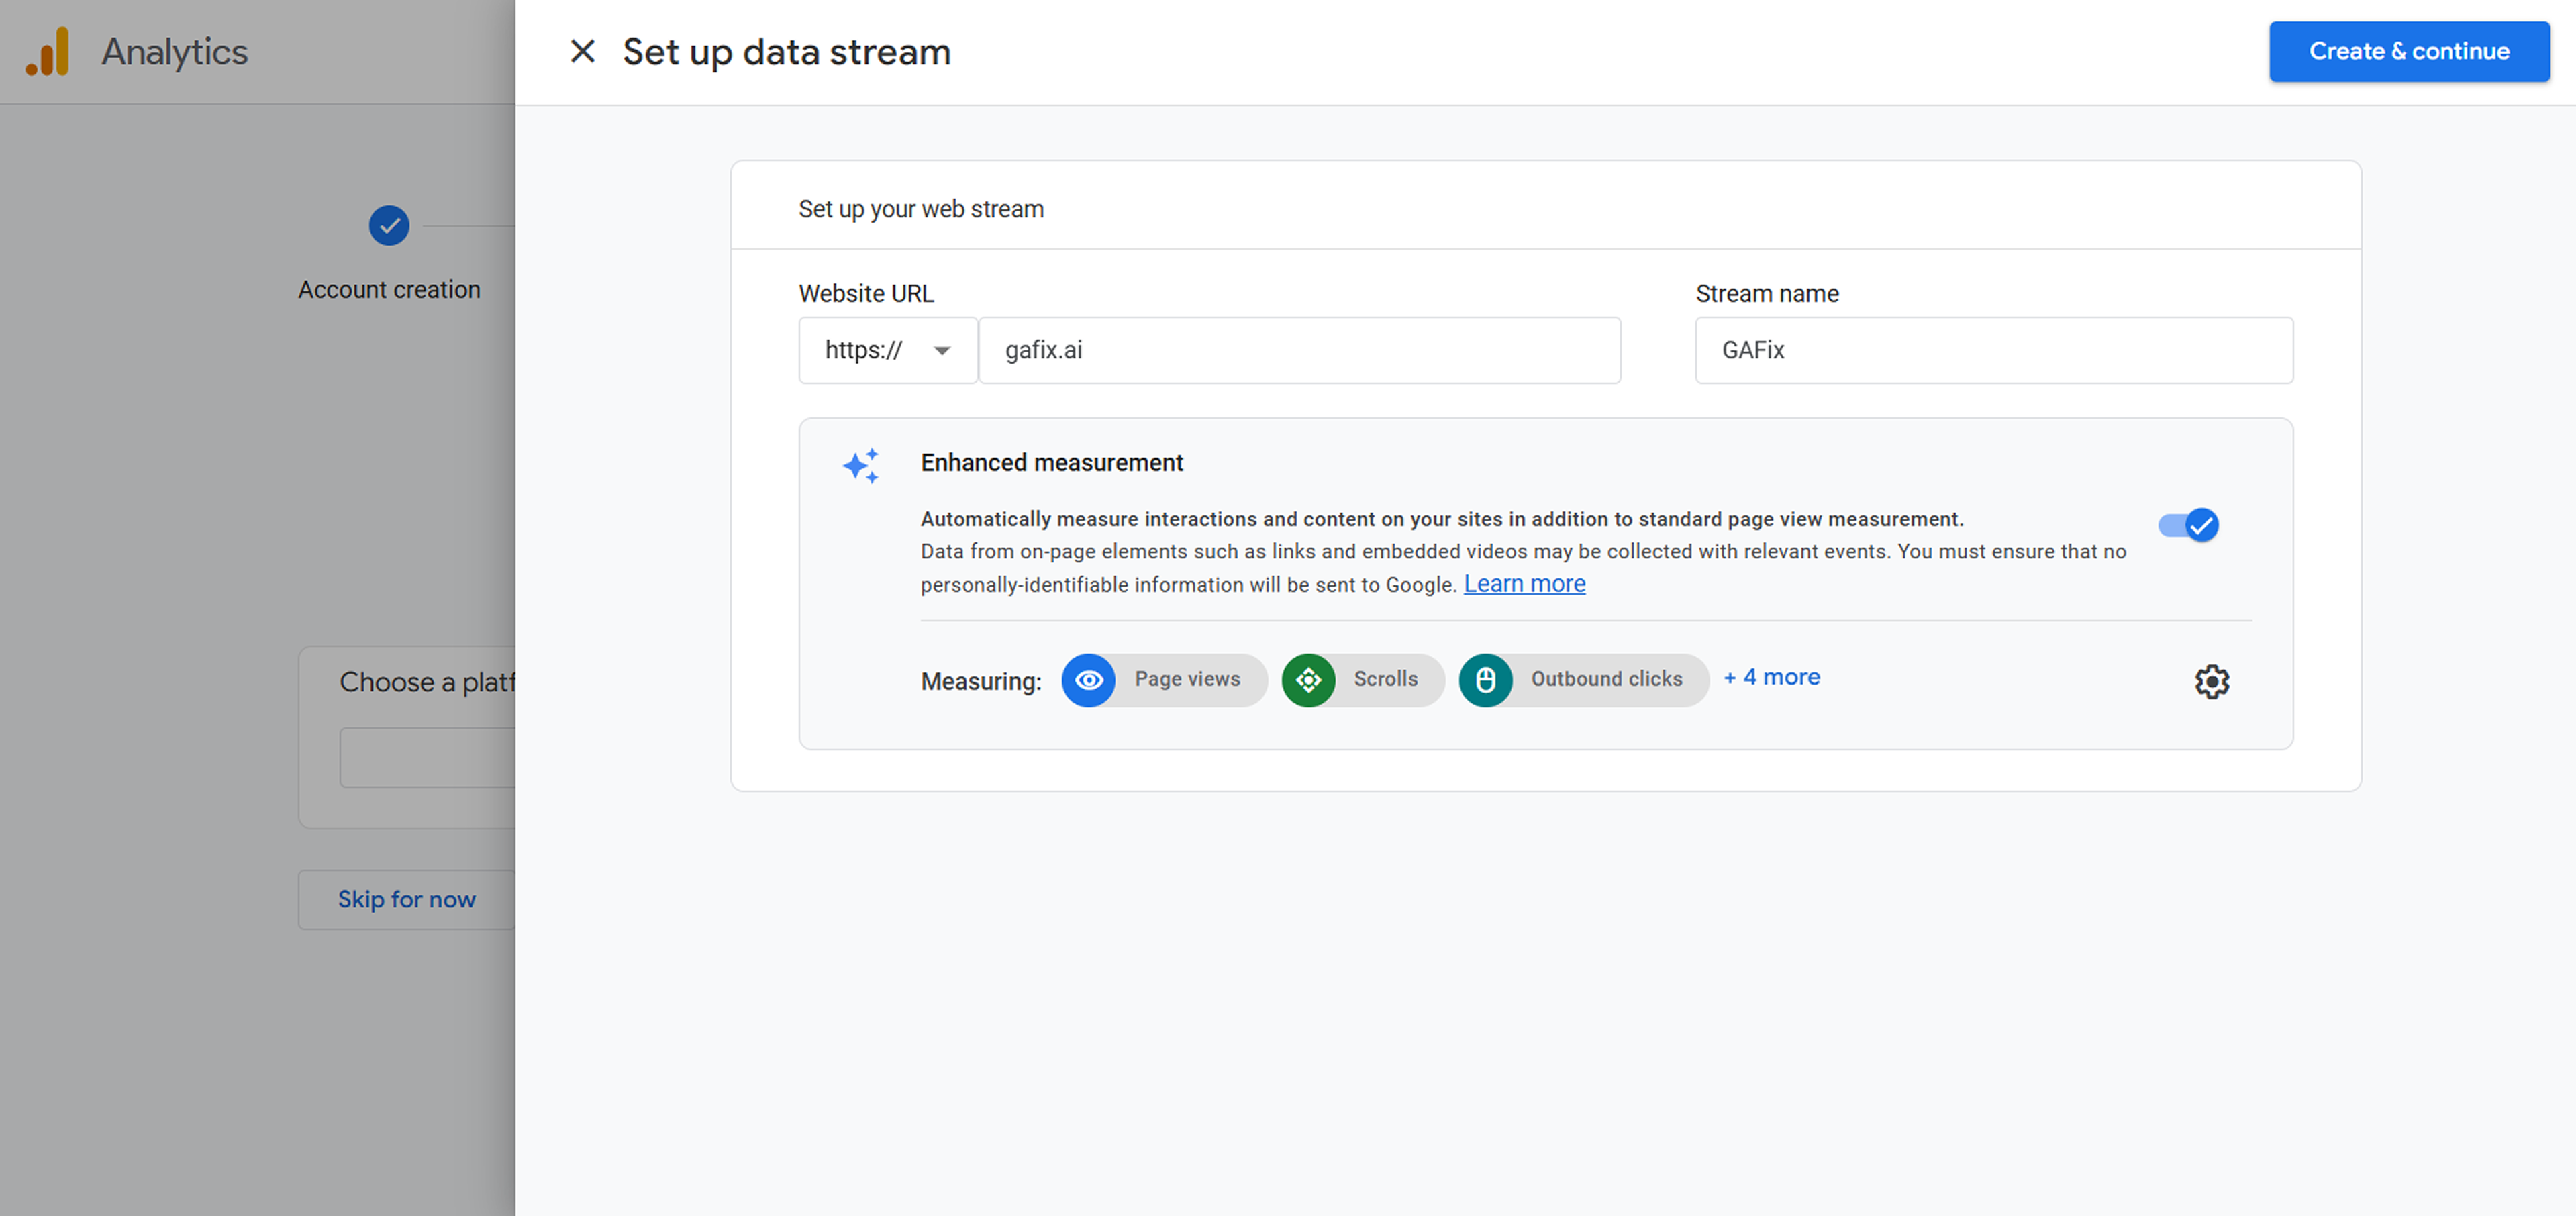
- Choose Web (not iOS or Android) as your platform.
- Enter your Website URL (e.g., https://www.mywebsite.com).
- Give your stream a name (e.g., “Main Site”).
- Leave Enhanced Measurement toggled ON (this helps you automatically track scrolls, outbound clicks, downloads, etc.).
- Click Create stream.
GA4 will now generate a Measurement ID (e.g., G-1ABCXYZ234) — this is critical for tracking. Copy it or keep the window open.
Step 4: Add the GA4 Tracking Code to Your Website
To start tracking, GA4 needs to send data from your website. You can do this in two main ways:
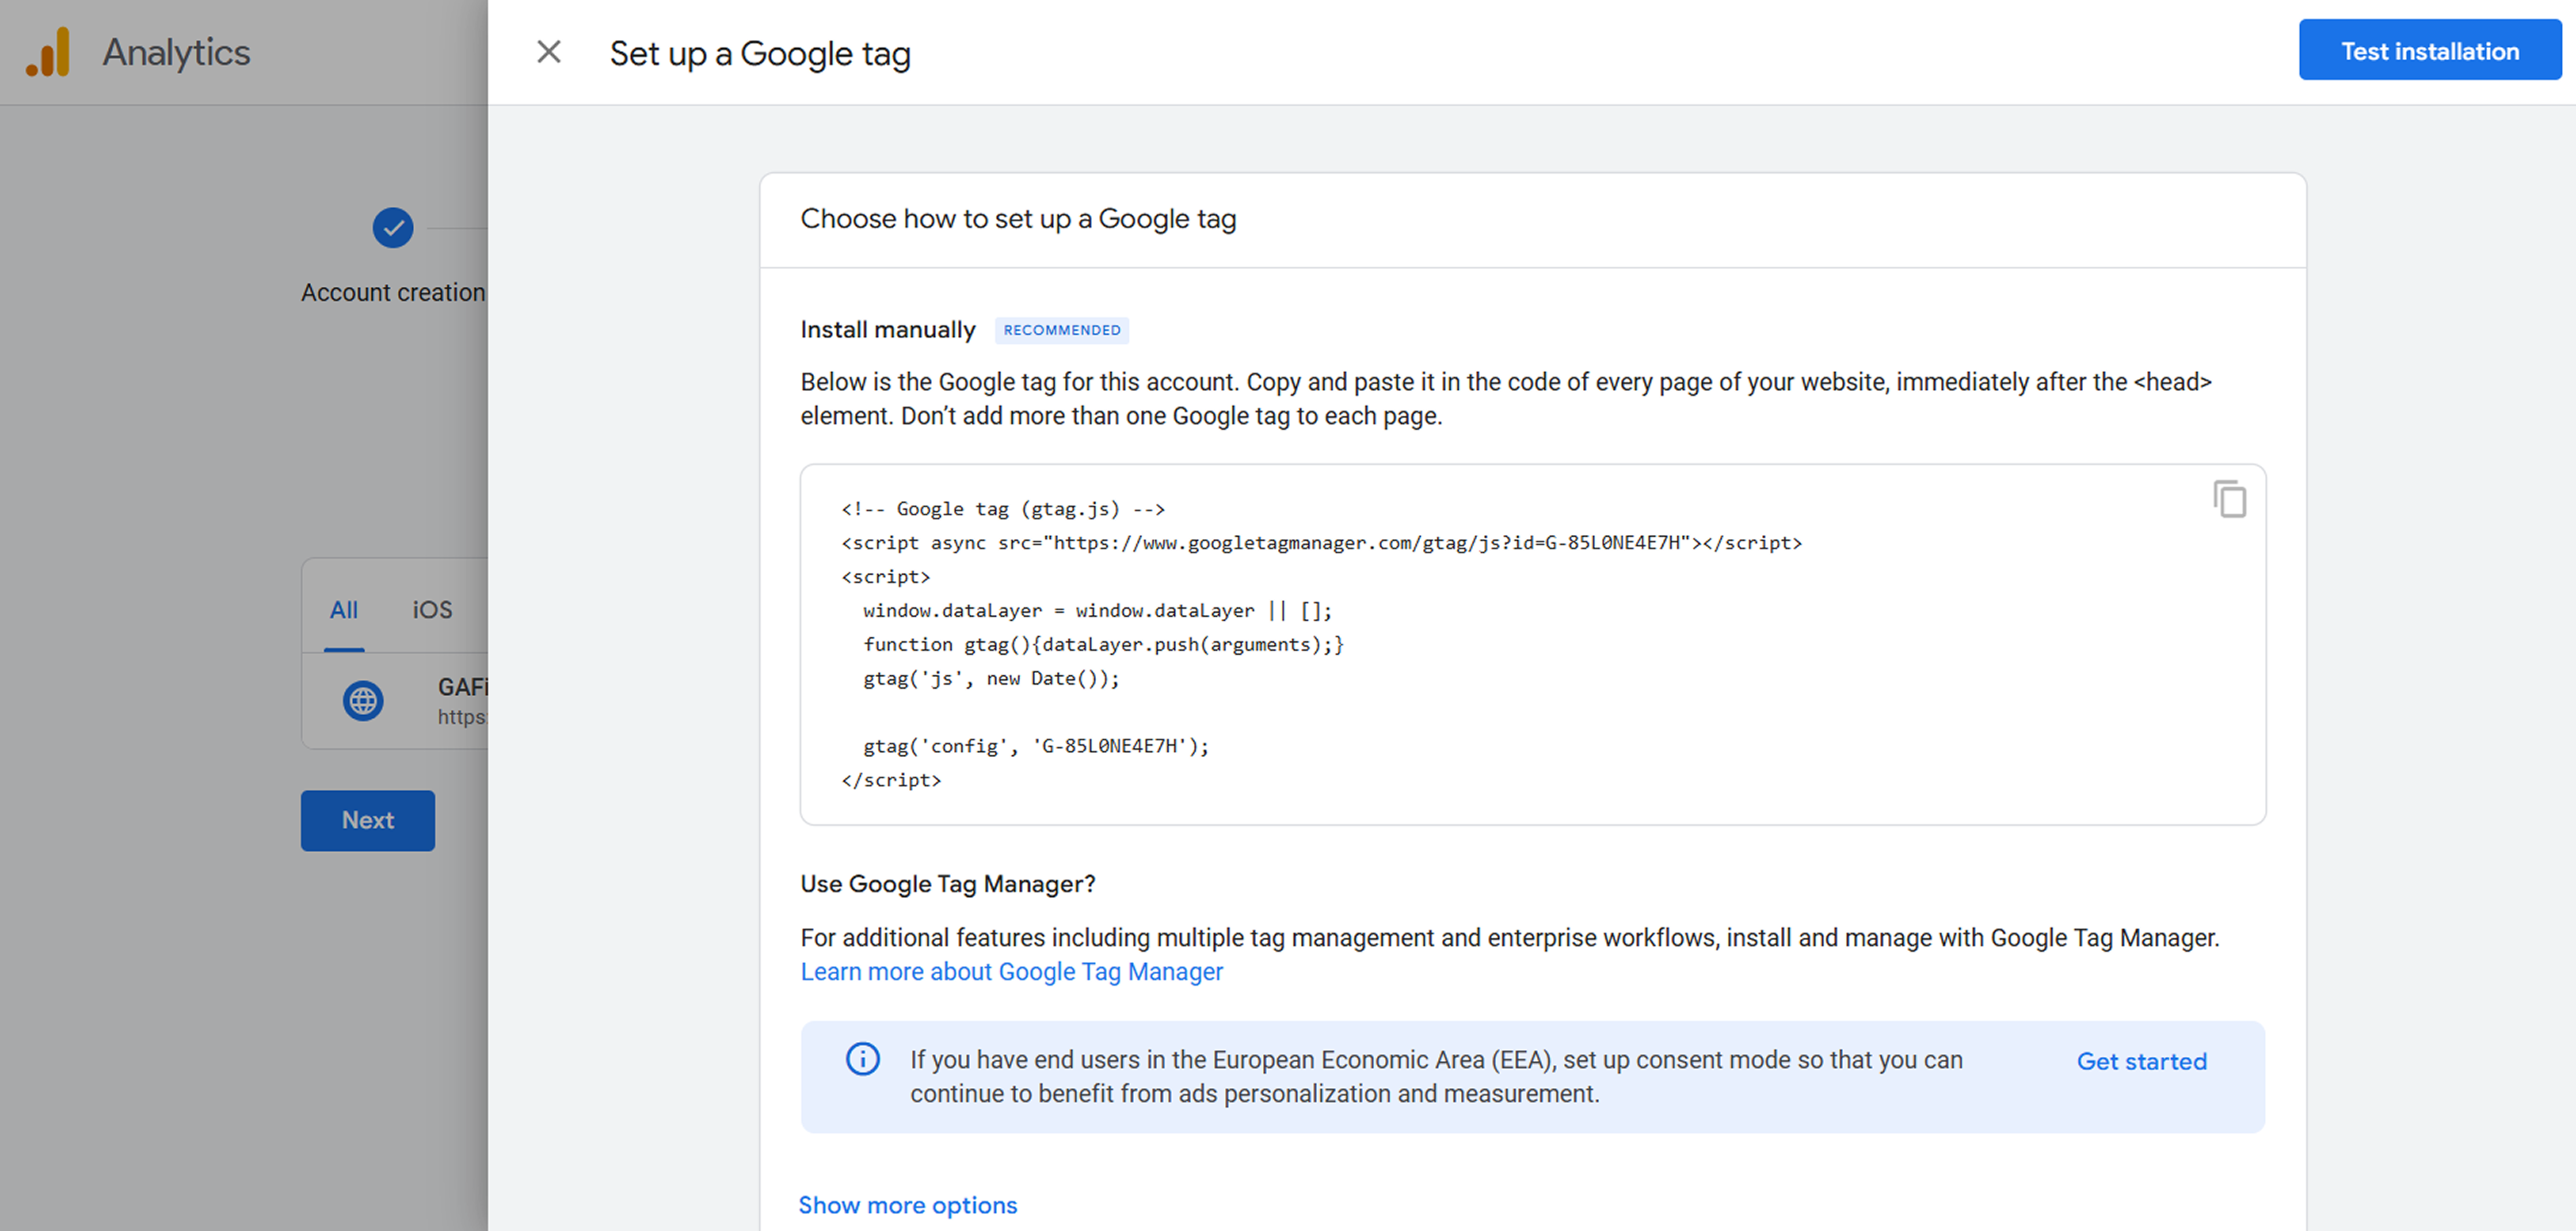
Option 1: Add Code Manually (Using HTML)
- Best for custom-coded websites and simple sites without a CMS.
- From your Web Stream Details page, go to Tagging Instructions > Global Site Tag (gtag.js).
- Copy the provided JavaScript snippet.
- Paste the code inside the <head> tag of every page you want to track.
Option 2: Use Google Tag Manager (Recommended)
This option is best for Sites using CMS platforms (like WordPress Shopify), or when you want to manage all tracking tags from one place.
- Go to https://tagmanager.google.com and create a GTM account and container.
- GTM will give you two code snippets — place them in your site’s HTML:
- One in the <head> section.
- One just after the opening <body> tag.
- In the GTM dashboard:
- Go to Tags > New > Tag Configuration > Google Analytics: GA4 Configuration.
- Enter your Measurement ID.
- Set the Trigger to All Pages.
- Save and Publish the tag.
Step 5: Confirm That GA4 Is Receiving Data
Now that the tracking code is installed, let’s check if it’s working. All you need to do is:
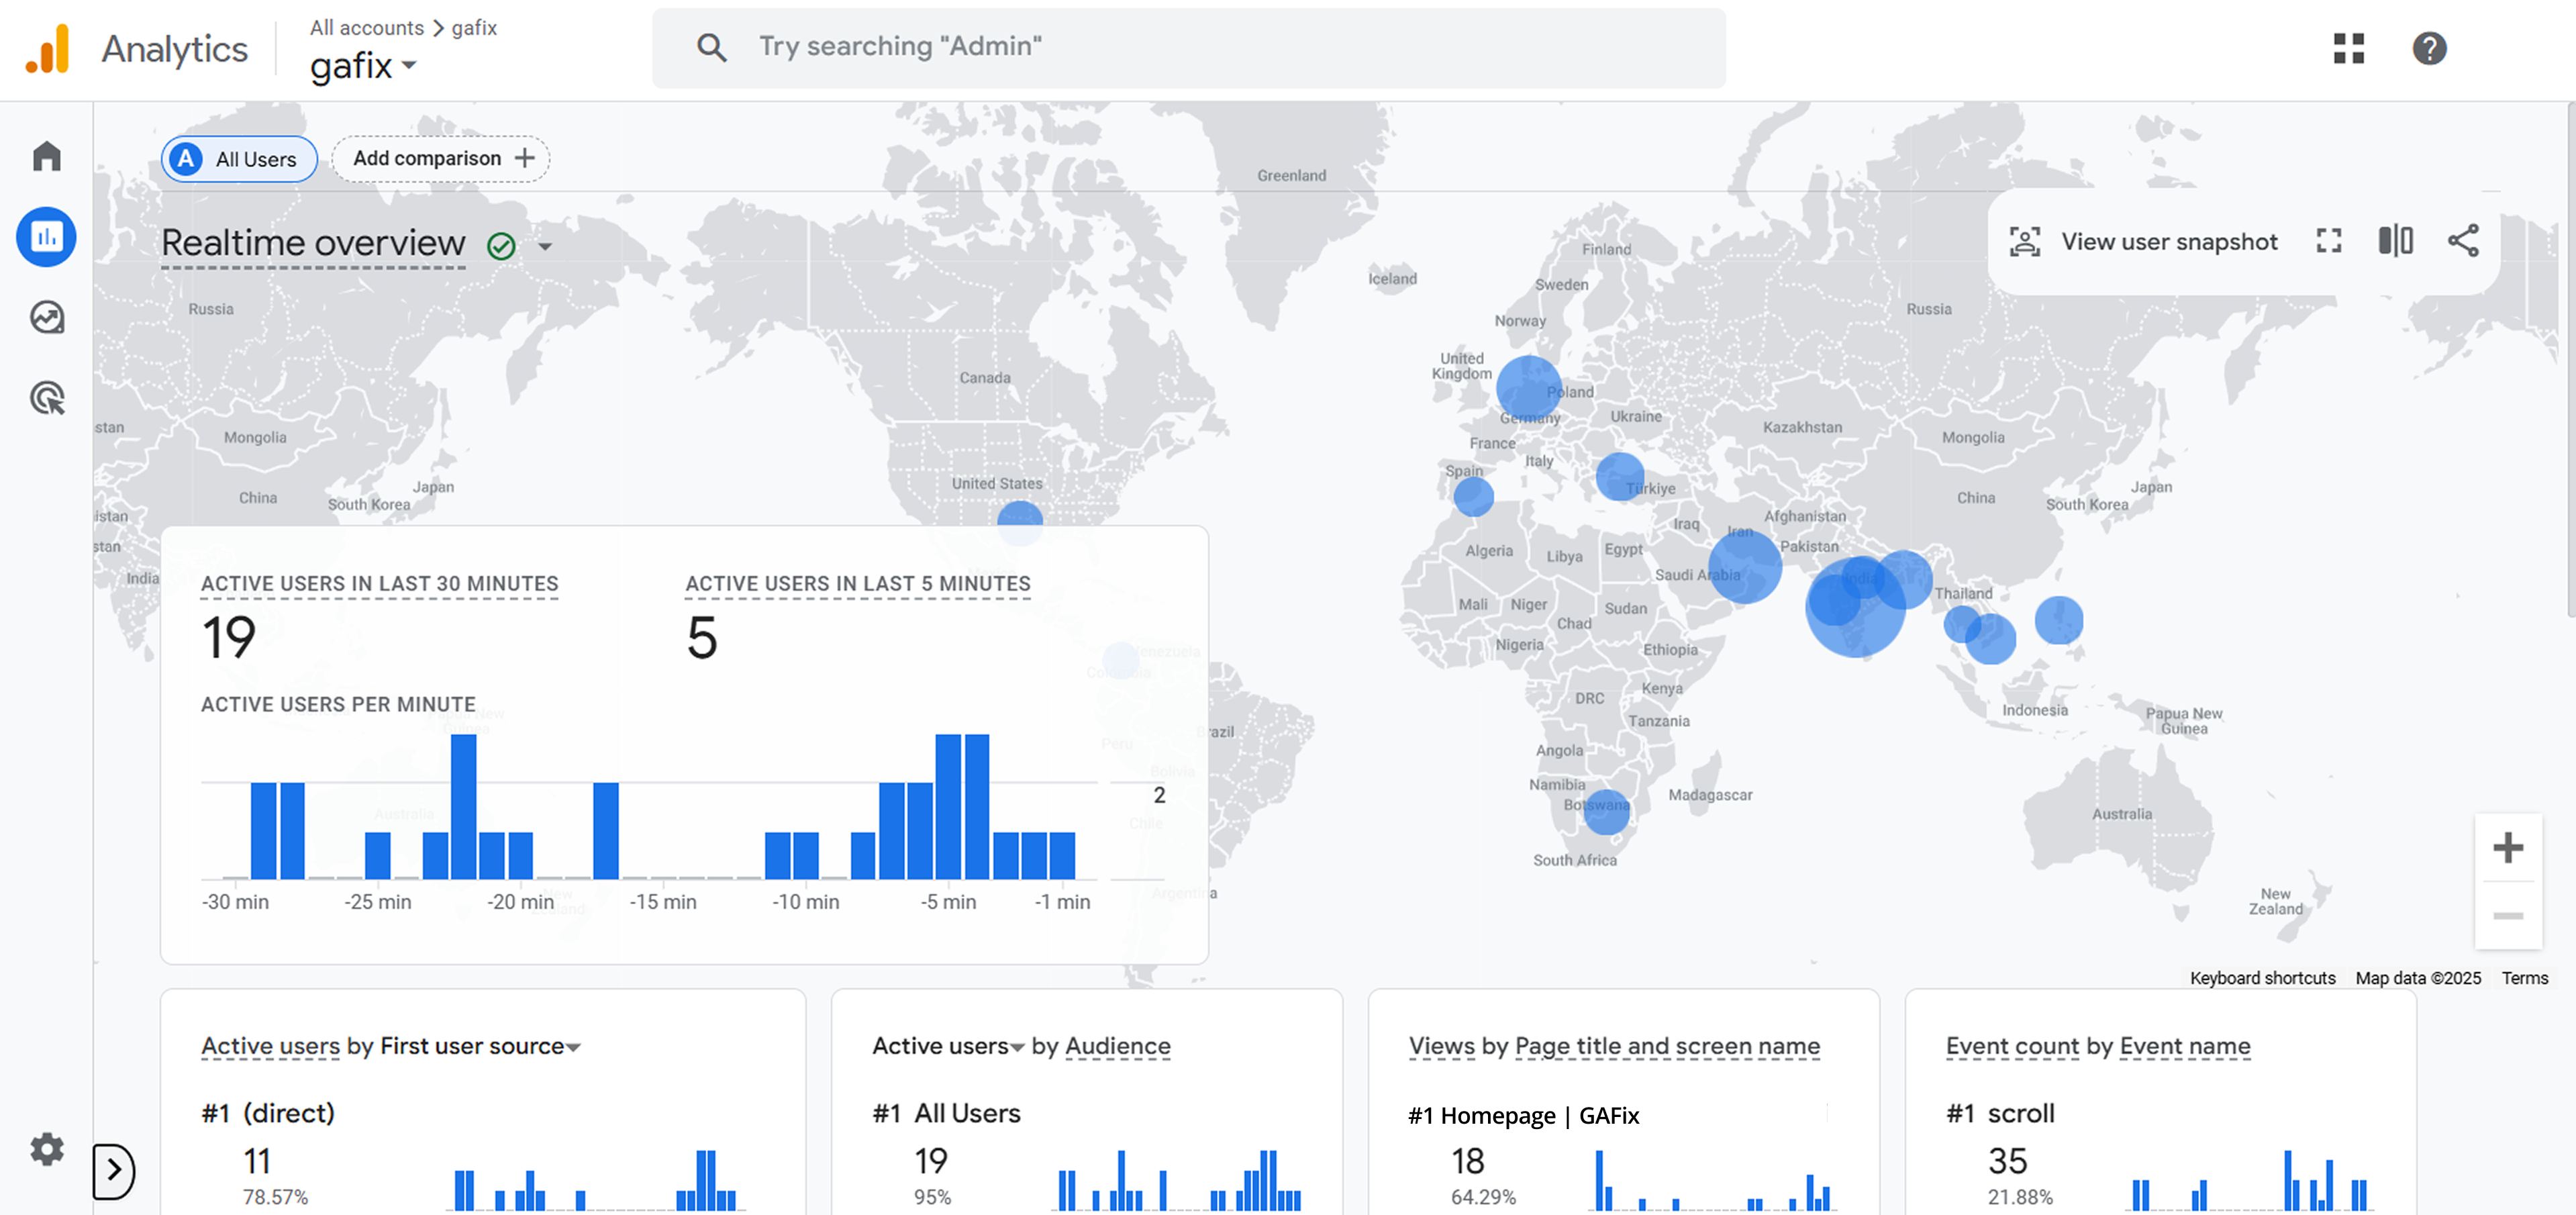
- Open your website in a new browser tab or on your phone.
- Go to your GA4 dashboard.
- Click Reports > Realtime.
- If everything is set up correctly, you’ll see active users on your site in real-time.
If no activity shows up, recheck your tag installation or try troubleshooting using Google’s Tag Assistant Chrome extension.
Step 6: Events
GA4 automatically tracks many events, but you can create custom events for deeper insights.
Auto-tracked events include:
- Page views
- Scrolls (90% scroll depth)
- Outbound link clicks
- Site search
- File downloads
- Video interactions
To create a custom event, you need to:
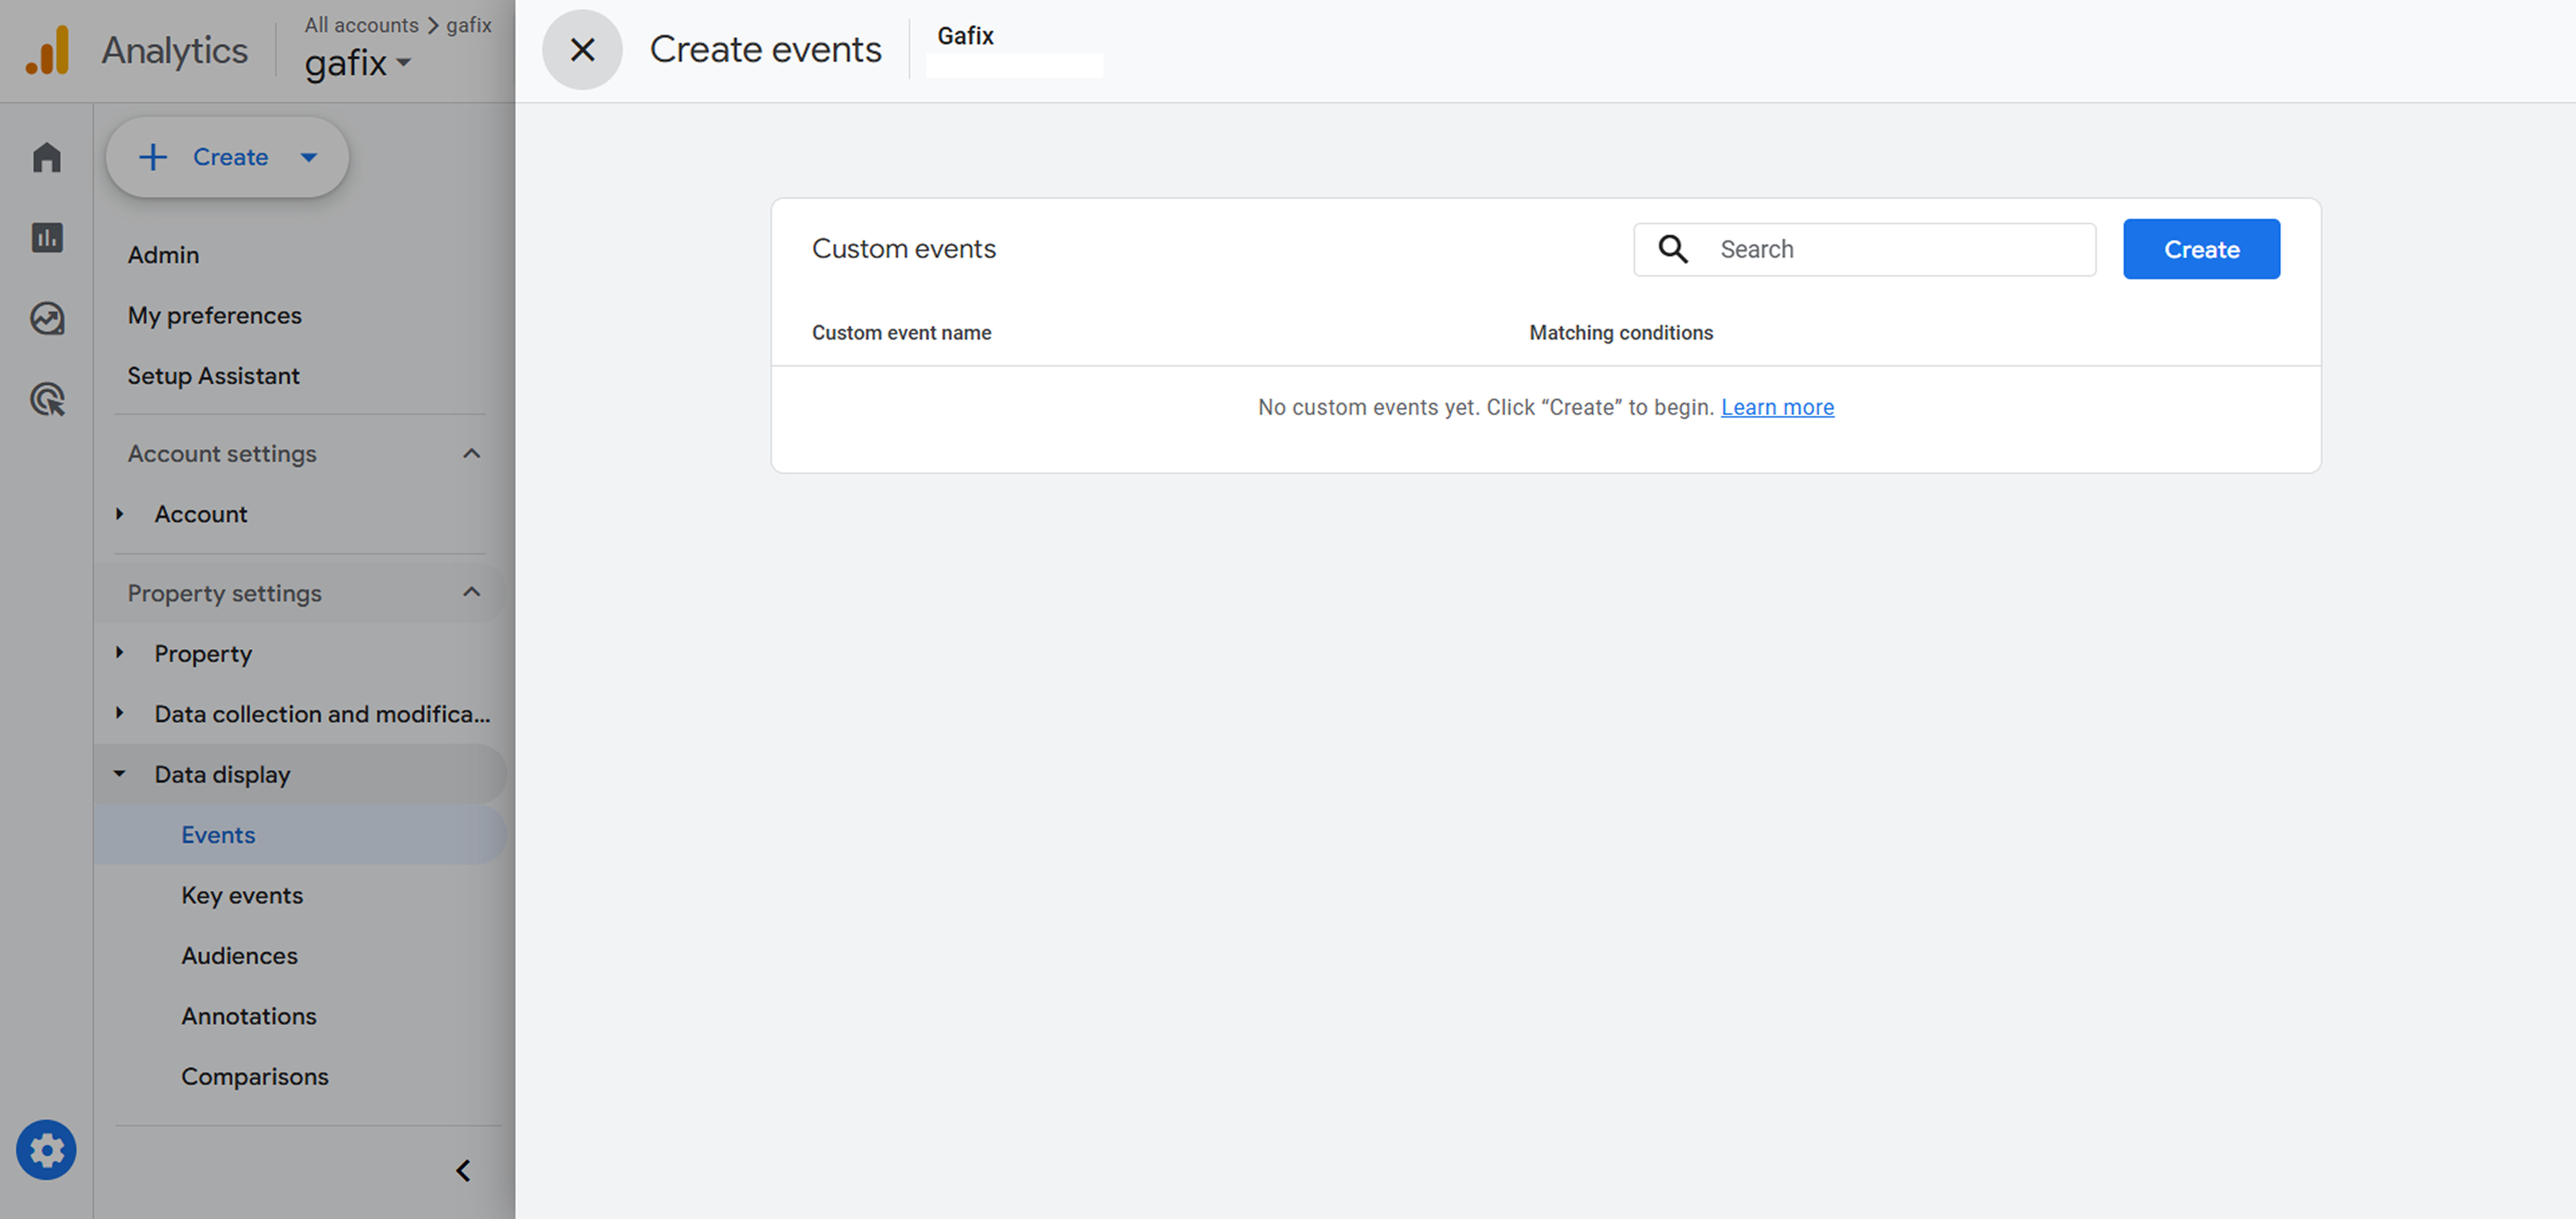
- Go to Admin > Events > Create event.
- Click Create.
- Enter a name like form_submit or cta_click.
- Set conditions (e.g., event_name equals “click” and element_id equals “subscribe_button”).
- Click Save.
You can also set up events using Google Tag Manager for more precision.
Step 7: Mark Important events as Key Events
Not all events are equally important. In GA4, you mark events representing business goals (e.g., purchases, lead submissions) as Conversions.

To mark an event as a conversion:
- Go to Admin > Events.
- Find the event (it must be triggered at least once).
- Toggle the switch under Mark as Conversion.
From now on, that event will appear in your Conversions report.
Step 8: Connect GA4 with Other Google Tools
Linking GA4 to other Google services provides richer insights and better ad performance.
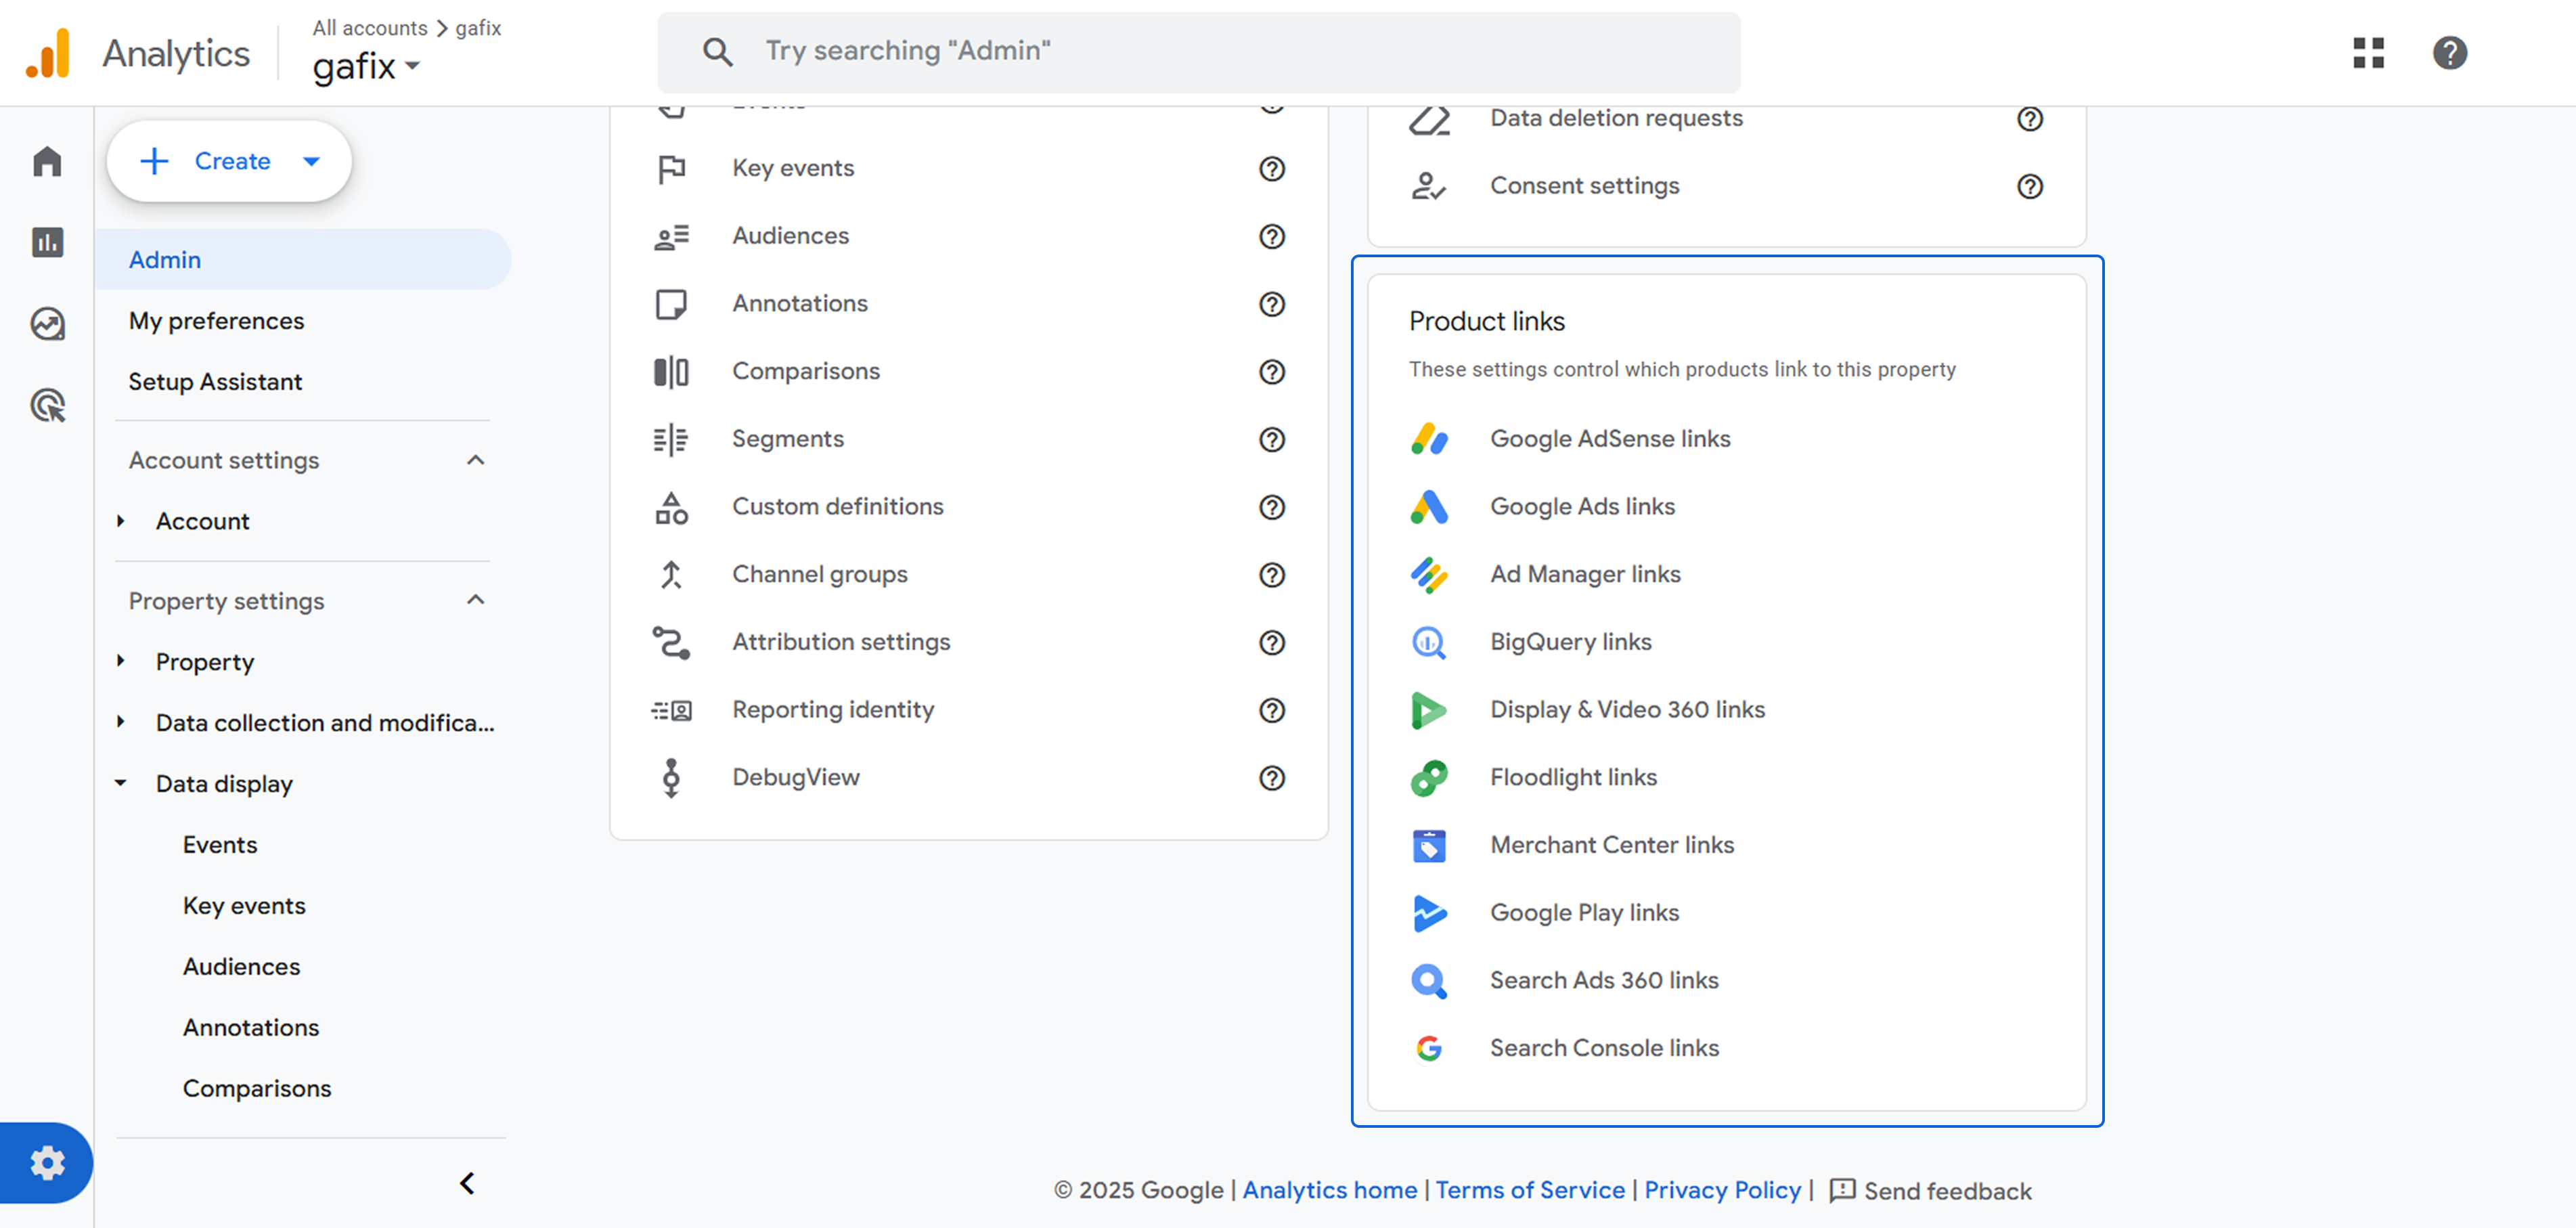
Recommended Integrations:
- Google Ads: Understand how your ads drive engagement and revenue.
- Google Search Console: See organic search performance.
- BigQuery: Export raw GA4 data for custom analysis.
- Google Optimize: Test and personalize content.
To link:
- Go to Admin > Product Links.
- Choose the platform (e.g., Google Ads).
- Follow the prompts to authorize the connection.
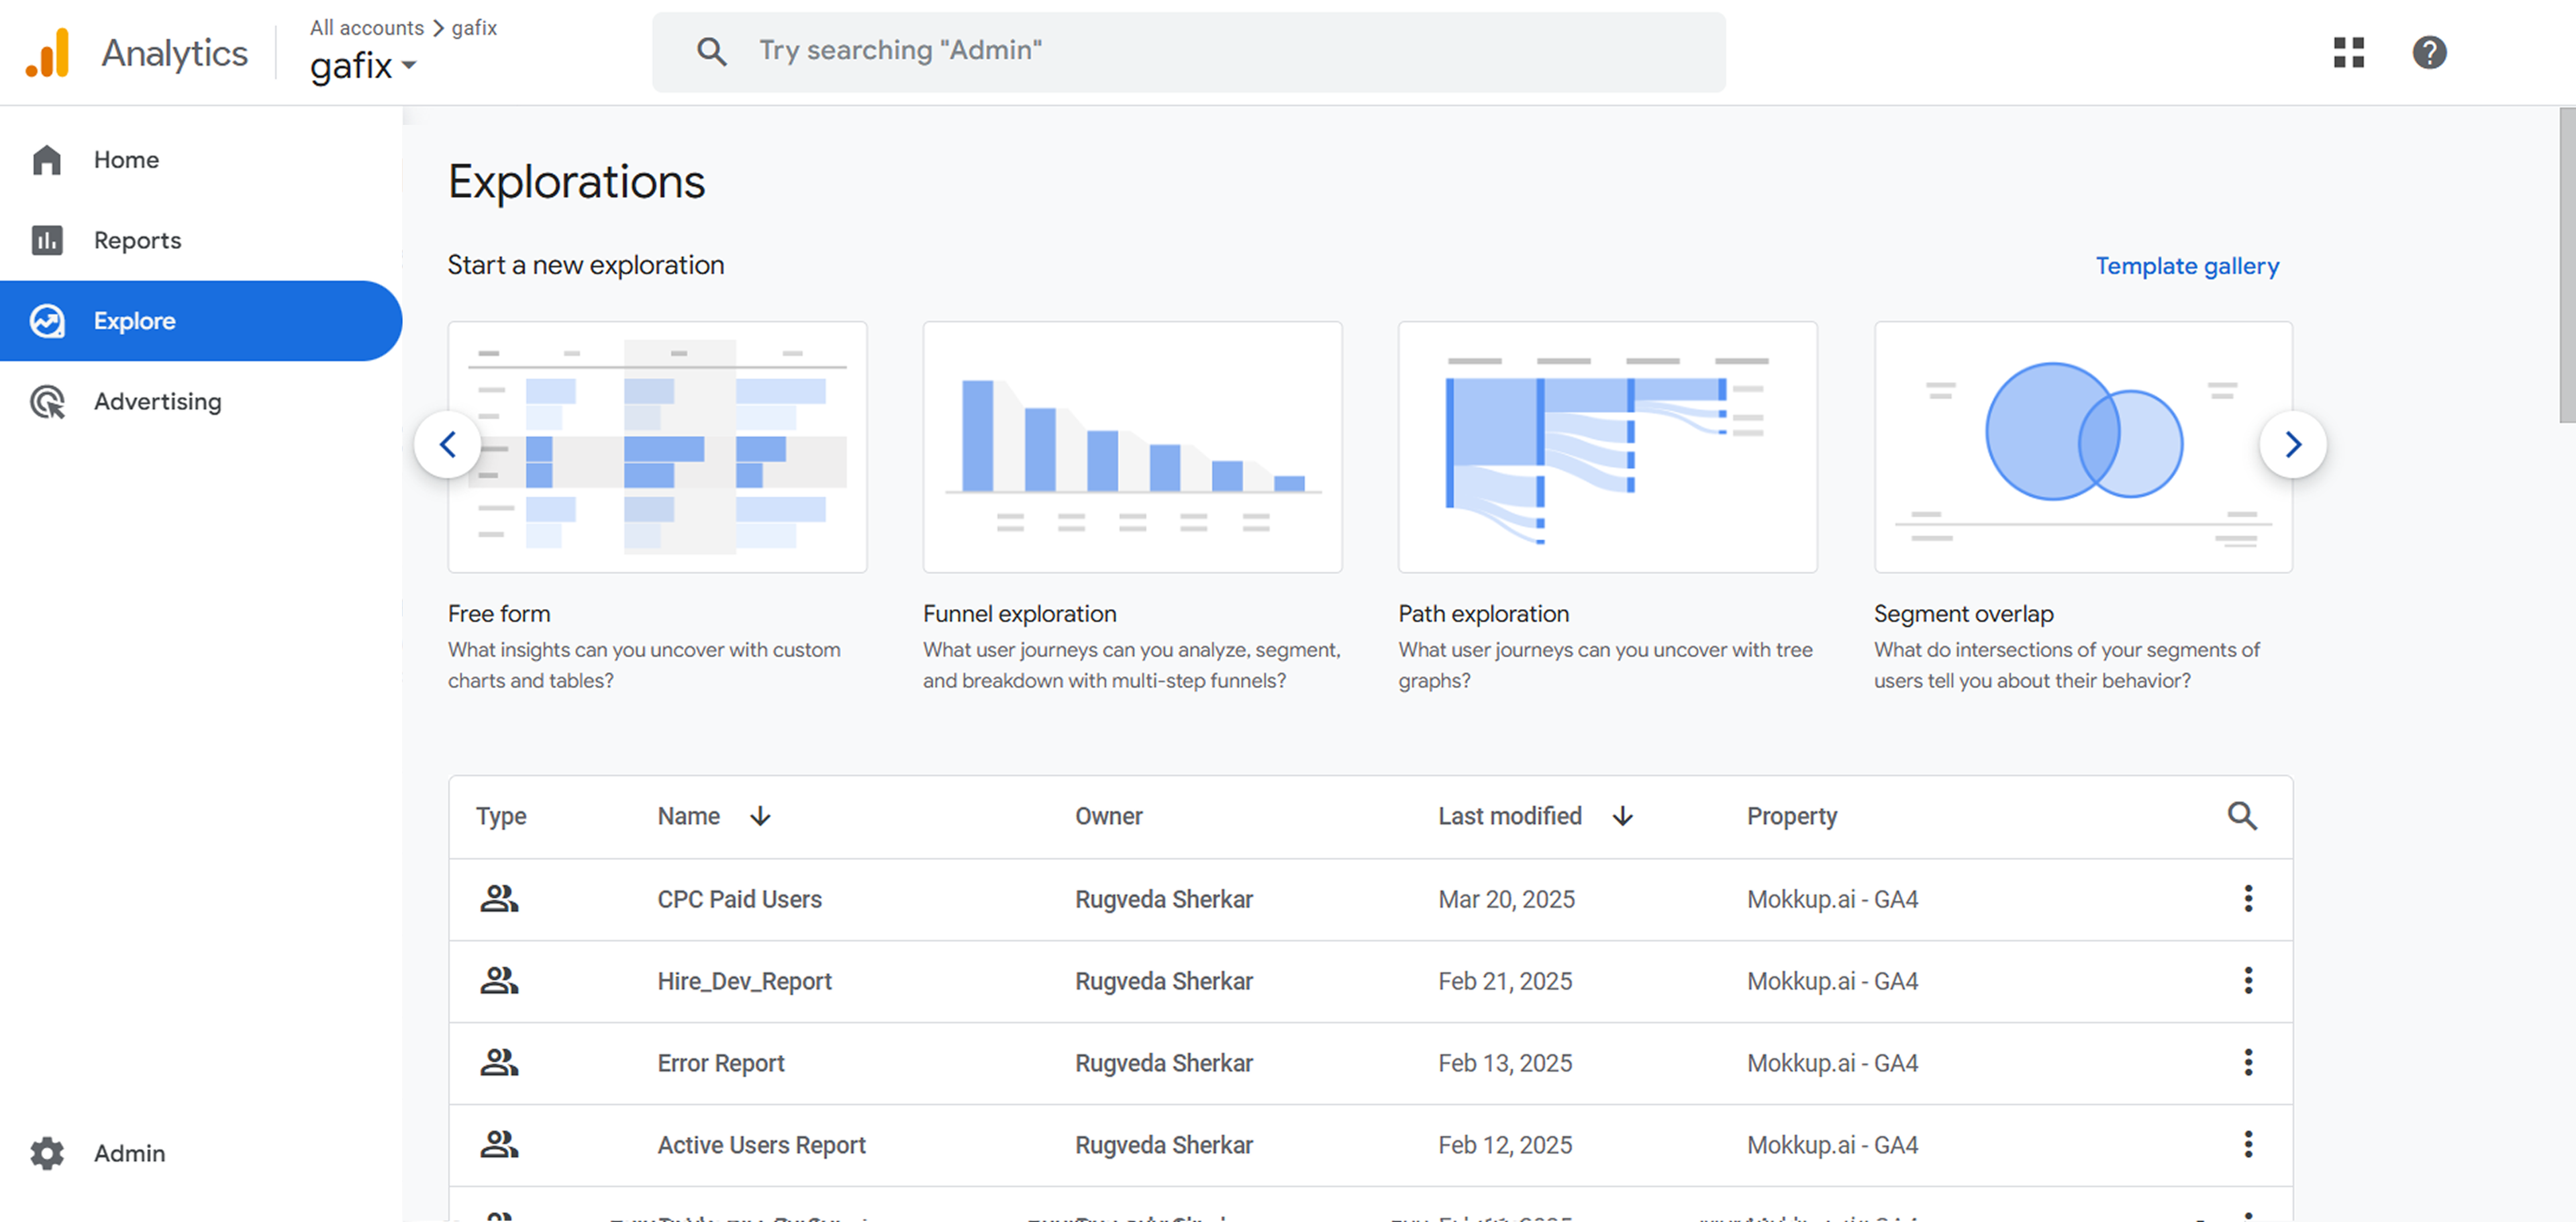
Step 9: Explore GA4 Reports
GA4’s reporting is centered around the user journey rather than individual sessions. Here are the key reports which you can see for deriving insights:
- Realtime: Live visitors and current activity.
- Engagement: Page views, average engagement time, events.
- Monetization: Purchases, revenue, and transactions (for eCommerce).
- User: Demographics like age, gender, and location.
- Tech: Browser, device type, screen size.
- Explore: Create custom funnels, user paths, and segment analysis.
Pro Tip: Save frequently-used Explorations to your dashboard for easy access.
Final Thoughts!
Google Analytics 4 isn’t just another upgrade — it’s a complete rethinking of how we understand user behavior in a multi-device, privacy-first world. By setting it up correctly, you’re not just collecting data — you’re building the foundation for more innovative marketing, better product decisions, and a more personalized user experience.
Whether you’re a solo entrepreneur, a growing brand, or an established enterprise, the GA4 setup gives you the clarity and control to measure what truly matters.
So don’t wait until you're flying blind—take the time today to complete your Google Analytics setup website process thoroughly. In the world of digital business, what gets measured gets improved.
Frequently Asked Questions
Do I need a developer to complete the Google Analytics 4 setup?

Not necessarily. Most basic Google Analytics setup for a website can be done without coding knowledge, especially when using GTM or plugins. However, for advanced event tracking, you may need developer support or a data analytics specialist.
Why is Google Analytics GA4 setup important for a website?
A proper Google Analytics setup website process ensures you can track user behavior, measure key actions (like purchases or signups), and make data-driven decisions to improve performance, UX, and ROI.
What is involved in the Google Analytics account setup process?
The Google Analytics account setup involves creating a Google account, setting up a GA4 property, configuring a data stream, and installing the tracking code on your website. Once done, you can begin collecting and analyzing user behavior data in real-time.
Join Our Early Access List & Unlock Exclusive Benefits Now


Subscribe To Our Newsletter


