


If you own or manage a website, tracking how it performs in a Google search is crucial. That’s where Google Search Console comes in. It’s a free tool from Google that gives you powerful insights into how your site appears in search results, which kind of keywords drive traffic, and what technical issues might hold it back.
In this guide, we’ll walk you through how to setup Google Search Console from scratch so you can unlock all the valuable insights it offers. Whether you’re new to SEO or an experienced webmaster, this guide will help you with every step of the Google Search Console setup process.
What Is Google Search Console?
Google Search Console is a free web service by Google that allows website owners to monitor, maintain, and troubleshoot their site’s presence within Google Search results. It doesn't show you everything (like real-time visitor behavior—that's Google Analytics’ job), but it’s the tool you need to improve your site’s visibility in search.
From keyword rankings to indexing errors, mobile usability issues to backlink data, Search Console is the nerve center of any SEO strategy.
Why You Need to Set Up Google Search Console
Before we get into the setup search console steps, let’s look at some of the benefits:
- Monitor your site’s performance in Google Search
- Identify and fix indexing issues
- Submit sitemaps for faster indexing
- Get alerts on site issues (security, crawl errors, etc.)
- Understand which keywords and pages bring in traffic
- See your backlink profile
- Enhance your SEO strategy with reliable data
With such benefits, the Google Search Console setup for website is a no-brainer for anyone looking to grow organic traffic.
Step-by-Step: How To Setup Google Search Console
Now, let’s get into the actual Google Search Console setup process and how to setup and install google search console:
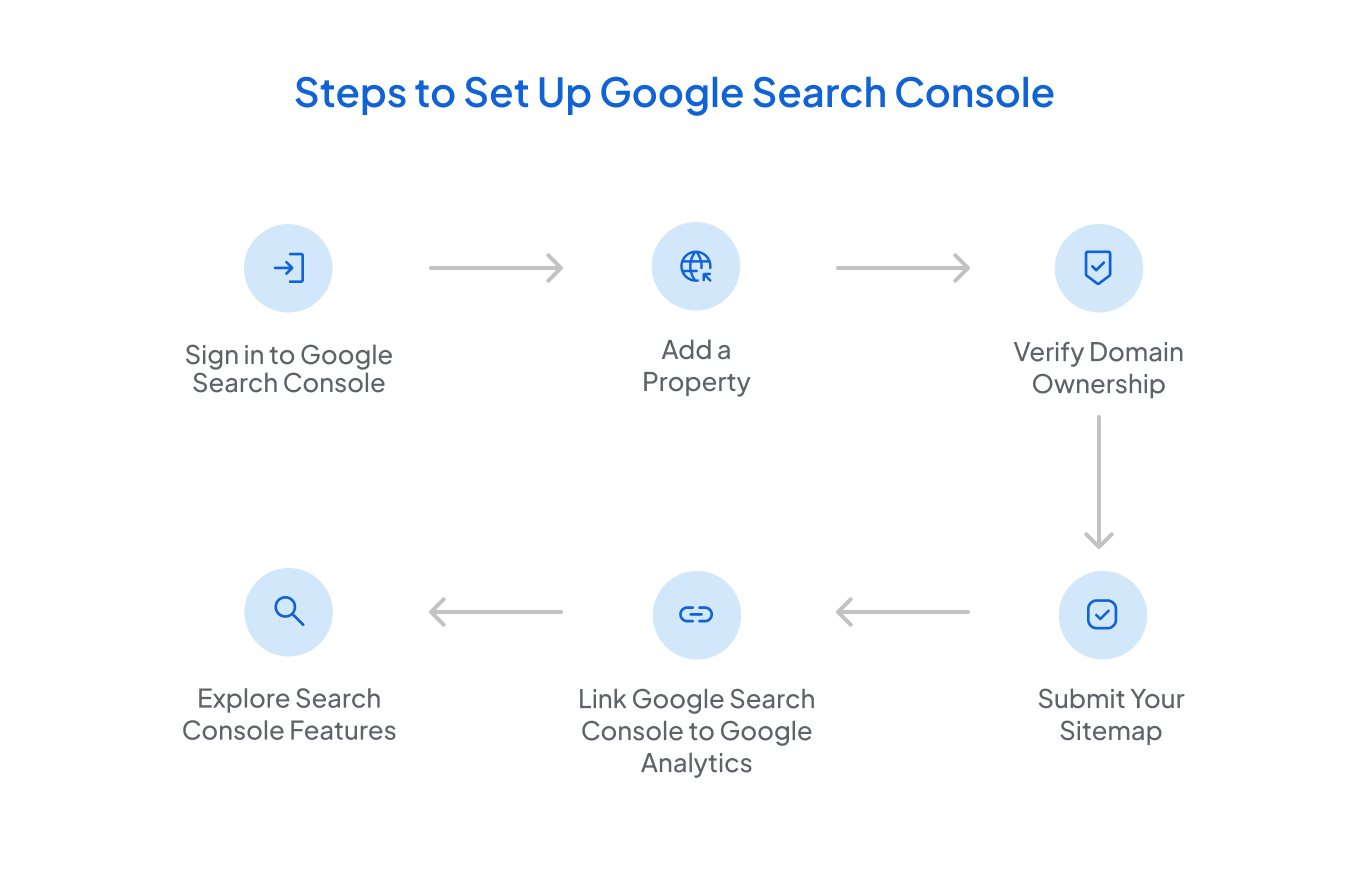
Step 1: Sign in to Google Search Console
Go to https://search.google.com/search-console and sign in using your Google account. Make sure you use the same account you’ll be using for Google Analytics or any other Google service linked to the site.
Step 2: Add a Property (Your Website)
After logging in, the first thing you need to do is add a property to the Search Console. This is essentially telling Google which site you want to track.
You’ll see two options:
- Domain (recommended): This tool tracks everything under your domain, including all subdomains and protocols (HTTP, https, www, non-www).
- URL Prefix – Only tracks the exact URL and path.
Recommendation: Choose Domain for a more comprehensive view. Enter your domain name (without http or https) and click “Continue.”
Step 3: Verify Domain Ownership
Before Google can show you any data, you must prove that you own the domain.
If you selected Domain property, you’ll be asked to verify using DNS:
- Copy the TXT record provided by Google.
- Go to your domain registrar (like GoDaddy, Namecheap, Cloudflare).
- Add the TXT record to your DNS settings.
- Save and return to Search Console to verify.
Verification might take a few minutes, but you're ready to move forward once it's done.
Pro Tip: DNS verification is the most robust method for those wondering how to set up and install Google Search Console correctly—especially if you want full tracking across all site versions.
Step 4: Submit Your Sitemap
Once your site is verified, you must submit a sitemap to set up your website search console.
- Go to the Sitemaps section on the left sidebar.
- Enter the URL of your sitemap (usually something like /sitemap.xml).
- Click Submit.
This helps Google understand your site structure and index your pages more easily.
Step 5: Link Google Search Console to Google Analytics
If you’re using Google Analytics, linking the two platforms for a more unified view of your data is a wise choice. Here’s how to do the Google Analytics Search Console setup:
- Go to Google Analytics.
- Navigate to Admin > Property Settings.
- Click on Adjust Search Console.
- Select your verified property.
- Save changes.
Now, you’ll be able to see Search Console data (like queries, landing pages, and CTR) directly in your Google Analytics account under Acquisition > Search Console.
Step 6: Explore Search Console Features
Now that your Search Console setup is complete, take some time to explore the dashboard. Here are a few key sections:
1. Performance Report
This shows you:
- Total clicks
- Impressions
- Average CTR
- Average position
It also breaks down this data by:
- Queries (keywords)
- Pages
- Countries
- Devices
Use this data to optimize your content for better rankings.
2. Coverage Report
Here you’ll see indexing issues, like:
- Pages indexed
- Pages with errors
- Excluded pages
Monitoring this regularly is essential to ensure your content is being found and indexed by Google.
3. Mobile Usability
With mobile-first indexing in place, this section helps ensure your site is mobile-friendly. Fix any issues flagged here to improve your rankings.
4. Page Experience & Core Web Vitals
Google now factors in user experience when ranking websites. These sections give insights into loading performance, interactivity, and visual stability.
Common Issues During Setup (and Fixes)
Even though the Google Search Console setup process is fairly simple, a few common issues can trip you up. Here are four of the most relevant problems and how to solve them quickly.
1. DNS Verification Fails
Problem: After adding the TXT record for domain verification, Google says it can’t verify your ownership.
Why It Happens:
- The TXT record was added incorrectly.
- DNS changes haven’t been propagated yet.
- The record was added to the wrong domain or subdomain.
Fix:
- Double-check that you copied the exact TXT record from Search Console.
- Make sure you’re editing the DNS settings for the correct root domain.
- Wait at least a few hours for the changes to take effect.
- Use a DNS checker tool (like MXToolbox) to confirm the record is live.
2. Wrong Property Type Chosen
Problem: You're missing traffic data or only seeing partial reports.
Why It Happens: You set up a URL Prefix property, which only tracks that specific version (e.g., https://www.example.com), instead of the more comprehensive Domain property.
Fix:
- Add a new Domain property in Search Console.
- Verify it using the DNS method.
- This will ensure you track all variations (http/https, www/non-www, subdomains) in one place.
3. Sitemap Not Accepted or Fails to Fetch
Problem: You’ve submitted your sitemap, but Google reports an error like “Couldn’t fetch” or “Sitemap has invalid URLs.”
Why It Happens:
- The sitemap file isn’t publicly accessible.
- The sitemap includes URLs that don’t match your verified property (e.g., wrong domain or protocol).
- Sitemap syntax or structure is incorrect.
Fix:
- Visit the sitemap URL directly in your browser to make sure it loads.
- Ensure the sitemap URLs match your verified domain and protocol.
- Use tools like XML Sitemap Validator to check for formatting issues.
4. No Data Appearing After Setup
Problem: You’ve completed the Search Console setup, but the dashboard shows zero data—even after a few days.
Why It Happens:
- Your site hasn’t been crawled yet.
- Pages aren’t indexed or are blocked by robots.txt or meta noindex tags.
- Your property isn’t set up correctly (wrong URL version).
Fix:
- Use the URL Inspection Tool in Search Console to check if key pages are indexed.
- Submit your sitemap to prompt crawling.
- Make sure your robots.txt file doesn’t allow important pages.
- Review your meta tags for accidental no-index directives.
Final Thoughts
Setting up Google Search Console is one of the smartest things you can do for your website’s SEO. It gives you visibility into how your site performs in search, lets you fix problems before they escalate, and empowers you to make data-driven decisions.
From how to setup a search console to submitting your sitemap and linking it with Analytics, the steps are simple—but the insights you gain are incredibly powerful.
So don’t delay. If you haven’t already, go ahead and setup Google Search Console for your website today with GAFix.ai.
Your SEO success starts here!

Frequently Asked Questions
Can I use Google Search Console with multiple websites?

Yes! You can manage multiple properties under the same Google account. Just repeat the setup Search Console process for each domain or subdomain you own.
Do I need technical knowledge to set up Search Console?
Not much. A basic understanding of DNS, HTML, or CMS plugins can help, but Google provides step-by-step instructions.
How to add property to the search console?
In order to add a property to the Search Console, click “Add Property” and choose Domain or URL Prefix. Then verify ownership using DNS, HTML tag, file upload, or Google Analytics.
Join Our Early Access List & Unlock Exclusive Benefits Now
%20for%20Your%20Website.png)


Subscribe To Our Newsletter


